Showing posts with label New Blogger. Show all posts

Sunday, June 17, 2007

How To Add A Backgound Image / Picture To Your Blogger’s Header

There are a few ways to add an image or a picture to a Blogger’s header as the background of blog’s title and description. However, some of the ways are more complex or need some changes to the HTML codes. I prefer the easy and simpler way.

Here are the steps of a simpler way to add an image to the Header:

1) Log in to Blogger. In the Dashboard, click “Layout” and it will bring you to “Template” >> “Page Element” tab.

2) Look at the Header’s Page Element at the top of the Layout which contains the title of your blog. Click “Edit” and you will get the following pop-up:


3) If the image for your header is saved in your computer, tick the option “From your computer” and click “Browse”. Then locate the folder where your image is saved.
If the image is hosted on the web, tick the option “From the web” and type the URL of the hosted image.

4) Click “Save Changes”. Then click “View Blog” to view the result.

NOTE:

a) If you don’t like what you see and want to remove the image, then click “Edit” again on the Header’s Page Element. In the pop-up window, click “Remove Image”, and then click “Save Changes”.

b) After doing the above steps, by default, the header image will be shown as the background of your blog title and description. In case you have a header image that already contains your blog title and description, you can also place the header image to cover the default blog title & description.
Here is how to do it:
Click “Edit” on the Header’s Page Element. In the pop-up window, you can see that the option “Behind title and description” under “Placement” has been ticked by default. Now tick “Instead of title and description” option instead. Then click “Save Changes”.

c) To get the best result for an image to be the header’s background, you should use the image that has the same width as the header of your blog. If you’re not sure what’s the width of your header, please refer to this post to find out: How To Find The Width Of The Header, Main Column And Sidebar Of The Blogger Templates

d) In case you’d like to change the title and description alignment (e.g. to be left-aligned instead of centered-aligned), you can read the following post:
How To Change The Text Alignment For The Blog Header’s Title And Description


You might be interested in the following topics:

* How To Add A New Page Element (For Adsense Ads or Image / Picture) In Blog Header Of Blogger Templates

* How To Add A New Page Element (For Adsense Ads/Link Unit, Google Search Bar, or Text)
At The Top Of The Main Column (Blog Posts) Of Blogger Templates


* Some Tips To Solve Problems in New Blogger

* How To Change The Width Of The Blogger Templates
Sunday, June 10, 2007

How To Add A New Page Element (For Adsense Ads/Link Unit, Google Search Bar, or Text) At The Top Of The Main Column (Blog Posts) Of Blogger Templates

The new Blogger standard templates or some other modified templates available in the web generally do not provide an “Add a Page Element” widget for us to add a page element at the top of the main column (blog posts column). The “Add a Page Element” widget is usually only available for sidebar and footer.

For instance, you want to place Adsense at the top the main column in every page. Or perhaps you’d like to place Google Search or welcome message text there. To do this, you need to add an “Add a Page Element” widget to the main column.

The following are the steps to add an “Add a Page Element” widget to the main column (blog posts column):

1) Log in to Blooger. In the Dashboard, click “Layout” and it will bring you to “Template” tab. Then click “Edit HTML”. This will open the template editor window.

2) Please remember that every time before you make any changes to the template, save a copy of your original codes first. In case there is something wrong, you can get back your original template again.
(Read this post in case you are not sure how to back up your template: How To Backup Your Blogger Template Codes).

3) Find the following codes in the template editor:
(You can simply click Ctrl+F for find the keyword <div id='main-wrapper'> in the codes).

<div id='main-wrapper'>
<b:section class='main' id='main' showaddelement='no'>
<b:widget id='Blog1' locked='true' title='Blog Posts' type='Blog'/>

4) Look particularly for: showaddelement='no'. Change it to: showaddelement='yes'. Then save the template.

5) After that, click "Page Elements". Now you can notice that an additional "Add a Page Element" has been added to the top of "Blog Posts".

Now you can add a page element at the top of the main column.
For example:
To add Adsense at the top of the main column, firstly generate the Adsense codes (for Ads Unit, Link Unit or Google Search Bar) from your Adsense account.Then click the "Add a Page Element” button at the top of the “Blog Posts”. When a new window pops up, select “HTML/Javascript”, and then click "Add to blog". Paste the Adsense codes into the box, and click "Save changes".

You might be interested in the following topics:

* How To Add A New Page Element (For Adsense Ads or Image / Picture) In Blog Header Of Blogger Templates

* How To Change The Text Alignment For The Blog Header’s Title And Description

* How To Change The Width Of The Blogger Templates

* Some Tips To Solve Problems in New Blogger

Saturday, June 9, 2007

How To Change The Width Of The Blogger Templates

Sometimes you may find the new Blogger (Blogger Beta) templates that you like for your blog. However, you’re not very happy with the width of the template. And you want to make some changes to the width of the template.

For example:
You are using standard Minima (2 column) template and you’d like to put adsense’s Banner format (468 x 60) at the top of the main column. However, the main column for the posts in the original template is a bit too narrow (410 px) for the Banner format, which needs at least 468 px width.
In this case, you’ll need to widen the main column slightly.

Here are the steps how to change the width of the main column in Blogger template:

1) Log in to Blogger. In the Dashboard, click “Layout” and it will bring you to “Template” tab. Then click “Edit HTML”. This will open the template editor window.

2) Please remember that every time before you make any changes to the template, save a copy of your original codes first. In case there is something wrong, you can get back your original template again.
(Read this post in case you are not sure how to back up your template: "How To Backup Your Blogger Template Codes").

3) Find the following codes in the template editor:
(You can simply click Ctrl+F for find the keyword “#header-wrapper”, “#outer-wrapper”, “#main-wrapper”, and “#footer” in the codes).

#header-wrapper {
width:870px;
margin:0 auto 10px;
border:1px solid $bordercolor;
}

#outer-wrapper {
width: 870px;
margin:0 auto;
padding:10px;
text-align:left;
font: $bodyfont;
}

#main-wrapper {
width: 410px;
float: left;
word-wrap: break-word; /* fix for long text breaking sidebar float in IE */
overflow: hidden; /* fix for long non-text content breaking IE sidebar float */
}

#right-sidebar-wrapper {
width: 220px;
float: right;
word-wrap: break-word; /* fix for long text breaking sidebar float in IE */
overflow: hidden; /* fix for long non-text content breaking IE sidebar float */
}

#left-sidebar-wrapper {
width: 220px;
float: left;
word-wrap: break-word; /* fix for long text breaking sidebar float in IE */
overflow: hidden; /* fix for long non-text content breaking IE sidebar float */
}

#footer {
width:870px;
clear:both;
margin:0 auto;
padding-top:15px;
line-height: 1.6em;
text-transform:uppercase;
letter-spacing:.1em;
text-align: center;
}

4) The width of the main column for the posts and each sidebar are 410px and 220px, respectively.
Whereas the width of the header, outer wrapper, and footer is 870 px. Since the template has 2 sidebars, the total width of the two sidebars plus the main column is: 410 + 220 + 220 = 850px. The difference of 20px (between 870px and 850px) should be for some spaces in between the columns.

5) Since the minimum width needed to place a Banner format is 468 px, suppose you’d like to increase the width of the main column to 470px.
That means you will need to add another 60px (=470px – 410px) to the original width.
Consequently, you would also need to add another 60px to the header, outer wrapper, and footer, as they too have to expand to accommodate the new width. Therefore, their width will be changed to 930px (=870 + 60).

Here are the parts of the codes that need to be changed:

#header-wrapper {
width:930px;

#outer-wrapper {
width: 930px;

#main-wrapper {
width: 470px;

#footer {
width:930px;

6) To see the effect of the changed codes, click “Preview” button at the bottom of box (always do this first before saving it). If the result looks fine, save the codes by clicking “Save” button.

Note:
You can use the same way for changing the width of the sidebars too. Just remember that when you change the width of the main column or sidebars, you need to adjust the 3 components (header, outer wrapper, and footer) by the same amount to maintain synchronization. Also, if you’d like to change both main column as well as sidebar, it’s better to do it one at a time. Don’t forget to preview first before saving the codes.

Hope this can help. :)


You might be interested in the following topics:

* Some Tips To Solve Problems in New Blogger

* How To Add A New Page Element (For Adsense Ads/Link Unit, Google Search Bar, or Text) At The Top Of The Main Column (Blog Posts) Of Blogger Templates

* How To Add A New Page Element (For Adsense Ads or Image / Picture) In Blog Header Of Blogger Templates

* How To Change The Text Alignment For The Blog Header’s Title And Description

Thursday, June 7, 2007

How To Find The Width Of The Header, Main Column And Sidebar Of The Blogger Templates

Sometimes, we need to know the width of the header, main column or sidebar of our blog.
For example, when we are selecting the format for the adsense code. Suppose I’d like to place Banner format (468 x 60) on top of the main column. That means the width of the main column must at least have 468px width.

Here is how you can find out the width of the header, main column or sidebar of your blog:

1) Find the following codes in the template editor:
(A faster way to do it is by using text search: Click Ctrl+F then type the keyword to be found: #header-wrapper, #main-wrapper, sidebar-wrapper).

#header-wrapper {
width:660px;
margin:0 auto 10px;
border:1px solid $bordercolor;
}

#main-wrapper {
width: 410px;
float: left;
word-wrap: break-word; /* fix for long text breaking sidebar float in IE */
overflow: hidden; /* fix for long non-text content breaking IE sidebar float */
}

#sidebar-wrapper {
width: 220px;
float: right;
word-wrap: break-word; /* fix for long text breaking sidebar float in IE */
overflow: hidden; /* fix for long non-text content breaking IE sidebar float */
}

2) Based on the above, the width of the header, the main column, the sidebar are 660px, 410px, and 220px, respectively.

So, in this case, if you want to place an adsense in Banner format (468 x 60) on top of the main column, it’s not enough. You need to expand the width of the main column to (at least) 470px.
In the next post, I’ll show you how. Stay tuned! :)

NOTE:

Some Blogger templates may have different “names” for the sidebar. The above example is the codes from standard (2-column) Minima template. In this template, the sidebar is shown as: “#sidebar-wrapper”.

Other templates which have 3 columns (with 2 sidebars) may use other “names” such as:
a) “#right-sidebar-wrapper” and “#left-sidebar-wrapper”
b) “.sidebar-wrapper”
c) “#sidebar-wrapper” and “#new-sidebar-wrapper”

Therefore, for sidebar, when you’re searching the codes using Ctrl+F, just use “sidebar-wrapper” as the text to be found.

Related Posts:

* How To Change The Width Of The Blogger Templates

* How To Add A New Page Element (For Adsense Ads/Link Unit, Google Search Bar, or Text) At The Top Of The Main Column (Blog Posts) Of Blogger Templates

* How To Add A New Page Element (For Adsense Ads or Image / Picture) In Blog Header Of Blogger Templates

Tuesday, June 5, 2007

How To Backup Your Blogger Template Codes

Before you make any changes to the Blogger template codes, please remember to save a copy of your original codes first as a backup. In case there is something wrong, you can get back your original template again.

There are 2 ways of backing up your Blogger template codes that I usually use:

ALTERNATIVE 1:

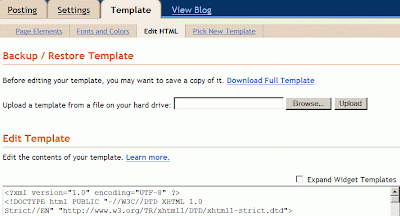
In the “Template” >> “Edit HTML” tab, click “Download Full Template”.
This way, the template will be saved as .xml file. You should name the file in such a way that you will remember which file to upload back in case you are not happy with the changes you will make.

To upload the template back, simply click “Browse” to locate where the file is saved, then click “Upload”.


ALTERNATIVE 2:

In the “Template” >> “Edit HTML” tab, tick “Expand Widget Templates”. Then click somewhere inside the box containing the codes, and click Ctrl+A, then Ctrl+C. Paste the codes to either MS Word, NotePad, or WordPad by clicking Ctrl+V there. Then save the file.

To upload the template back when you’re not satisfied with the changed codes, erase the codes first, then paste back the original template codes you have saved earlier.

Here is the steps:
Tick “Expand Widget Templates”, click somewhere inside the box containing the codes, and click Ctrl+A, then press “Delete”. Open the original template file, click Ctrl+A, then Ctrl+C. Then back to the Blogger template editor again and click Ctrl+V to paste the codes there.

I personally prefer Alternative 2, because I can study the codes in the MS Word, NotePad, or WordPad, or even make the code changes there first rather than doing it directly inside the template editor. But of course, I must remember to save the changed code in different name, so that I can maintain the original codes as the backup.

You might be interested in the following topics:

* How To Add A New Page Element (For Adsense Ads/Link Unit, Google Search Bar, or Text) At The Top Of The Main Column (Blog Posts) Of Blogger Templates

* How To Add A New Page Element (For Adsense Ads or Image / Picture) In Blog Header Of Blogger Templates

* How To Change The Text Alignment For The Blog Header’s Title And Description

* How To Change The Width Of The Blogger Templates

Sunday, June 3, 2007

Some Tips To Solve Problems in New Blogger

I encounter problems with New Blogger quite often. Among the problems I ever had are weird looks in my Dashboard or “create post” template, cannot publish any posting, cannot upload pictures / images in a post, cannot add new page element as the “Add a Page Element” buttons in the “Layout” disappear, cannot edit the existing page element, cannot publish or save a long post, etc.

When you also face such problem with Blogger, you can try the following tips first. These are some tips I came across from the Blogger Forum when I was searching the solution for my problems. Probably one of these tips can save your day. :)

1. SIMPLY REFRESH YOUR PAGE
This is particularly when you encounter a weird look on your Dashboard once you log in.

2. CLEAR YOUR CACHE AND COOKIES
Before doing this, log out from your Blogger first. In case you have no clue how to clear cache and cookies, here are the steps.

Just sharing my experience. There was one time I encountered problem with Blogger whereby I could not publish or save my post. Even worse, after that I couldn’t log out too. So I just closed the window. When I tried to log in again, I couldn’t even get logged in.
However, after I clear the cache and cookies, I could log in again.

3. DISABLE THE POP-UP BLOCKER FUNCTION
Other than clearing cache and cookies, this is also one solution I always try when I could not add new page element, as the “Add a Page Element” widgets in the Layout are missing.

Here is what I usually do:
Log out from Blogger first, then disable the pop-up blocker function as well as clear cache & cookies. Log in again. (If it still doesn’t work, try to restart your computer).

However, most of the time, for me, this problem can be solved by simply changing the browser from Windows Internet Explorer to Mozilla Firefox (See the next point - no 4).

4. TRY USING ANOTHER BROWSER
If you’re using Windows Internet Explorer (IE), try to use Mozilla Firefox (FF), or vice versa.
Sometimes, this simple solution works for me too. Some problems I encounter in Blogger, such as missing “Add a Page Element” widgets in the Layout problem, or cannot upload pictures / images, can simply be solved by changing the browser from Windows Internet Explorer to Mozilla Firefox.

I personally find that for blogging using Blogger, I face more problems / errors when I am using Internet Explorer as the browser than when I am using Firefox.

In case you don’t have Mozilla Fire Fox browser yet, find the Fire Fox button at the sidebar of this blog. You can download and install the Fire Fox absolutely FOR FREE from there.


You might be interested in the following topics:

* How To Change The Width Of The Blogger Templates

* How To Add A New Page Element (For Adsense Ads/Link Unit, Google Search Bar, or Text) At The Top Of The Main Column (Blog Posts) Of Blogger Templates

* How To Add A New Page Element (For Adsense Ads or Image / Picture) In Blog Header Of Blogger Templates

* How To Change The Text Alignment For The Blog Header’s Title And Description

Friday, June 1, 2007

How To Add, Remove, or Edit Labels On Multiple Posts At Once in New Blogger

Here are the steps on how to manage (add, remove, or edit) labels/categories/tags on multiple posts at once in new Blogger:

1. From Dashboard, click Manage “Posts” link, then it will bring you to “Posting” >> “Edit Post” tab.

2. This page has a list of all labels used in the blog (at the left-hand side). If you click on a certain label in that list, the list of posts will be narrowed down to display only the posts with that particular label.


3. Each individual post also has its particular labels (in green font) next to its title. If you want to make changes to multiple posts, first tick the checkbox of all posts you want to change. Then select an option from the "Label Actions..." menu.
There are 2 options in the menu: to add new labels (Apply label), or to remove existing labels (Remove label) from the ticked posts.

4. To add a new label to the posts you have ticked, in the "Label Actions..." menu, choose "Apply label > New Label...". Then type your new label.
If you already have some posts with the label you want, you can simply apply that label without making a new label.

5. To remove an existing label from the posts you have ticked, in the "Label Actions..." menu, choose "Remove label” > Then select the label you want to remove from those posts.

6. If you want to edit a label from all posts you have ticked, you can do so by removing it first and then adding a new one.

7. If you want to edit all post with a particular label, you can click that particular label from the label list at the left-hand side of the page first. Then only the posts with that label will appear in the list of posts. After that, click “Select All” at the top of the list of posts, and then edit them.
To remove the ticks from the posts, click “None”, just next to “Select All” at the top of the list of posts.


You might be interested in:

* How To Label A Post And Add A Label Widget (Create Categories) At The Side Bar In New Blogger

* Some Tips To Solve Problems in New Blogger

* How To Add A New Page Element (For Adsense Ads/Link Unit, Google Search Bar, or Text) At The Top Of The Main Column (Blog Posts) Of Blogger Templates

* How To Add A New Page Element (For Adsense Ads or Image / Picture) In Blog Header Of Blogger Templates

* How To Change The Width Of The Blogger Templates

Thursday, May 31, 2007

How To Label A Post And Add A Label Widget (Create Categories) At The Side Bar In New Blogger

Categories or Tags are called LABELS in new Blogger. Labels are important keywords which describe what your post is all about. Labels are normally shown below the post. To make your blog more reader-friendly, add a Label Widget in the sidebar which allows the viewers to instantly locate the posts that are relevant to his topic of interest. By clicking on a label below a post or in the Label Widget at the sidebar, the readers will be able to see all the posts with that label.

How To Label A Post

When you are writing a post, you will see "Labels for this post” at the bottom of the form. Enter any labels relevant to your post and separate them with commas. You can also click the "Show All" link to display all labels you have used previously. Then just click on the labels in the list to add them as the label of your current post.
After you publish the post, you can find the labels below that post.

How To Create A Label Widget At The Side Bar

1. From Dashboard, click Manage “Layout” link, then it will bring you to “Template” >> “Page Element” tab.

2. In the “Page Element” tab, click “Add A Page Element” of the sidebar. A new window that shows a variety of elements will pop up. Select “Labels” option and click “Add to Blog” button.

3. “Configure Labels” window will then appear on the screen. Write an appropriate title for the labels and select the sorting style of your preference (alphabetically or by frequency). Then click “Save Changes” button.

4. Click “View Blog” button to view your blog with category / label list at the sidebar. Congratulation! Now you have successfully created a category / label list at the sidebar of your blog. :)


Related Posts:

* How To Add, Remove, or Edit Labels (Categories) On Multiple Posts At Once in New Blogger

* Some Tips To Solve Problems in New Blogger

* How To Add A New Page Element (For Adsense Ads/Link Unit, Google Search Bar, or Text) At The Top Of The Main Column (Blog Posts) Of Blogger Templates

* How To Add A New Page Element (For Adsense Ads or Image / Picture) In Blog Header Of Blogger Templates

* How To Change The Width Of The Blogger Templates